When dealing with insurance claims, detailed and accurate photo documentation can make the difference between getting paid fast or getting stuck in a never-ending claims battle.
Insurance companies are notorious for nitpicking incomplete reports and denying claims due to “missing information.” That’s where CompanyCam comes in — helping contractors organize, document, and submit airtight claims that leave no room for denial.
In this guide, we’ll show you how to create professional photo reports that will ensure your insurance claims get approved faster.
1. How to Create a Photo Report
Insurance companies hate disorganized photo submissions. With CompanyCam, you can create detailed reports in minutes. Here’s how to create a photo report:
Open Your Project: Select the project with the photos you need.
Select Photos: Click the date bubble to mass-select all photos taken that day or manually select specific images.
Create Report: Click the “Reports” button, select “Create New Report,” and give it a relevant title (e.g., project address).
Customize the Report: Add a cover page, company logo, and section summaries.
Before finalizing the report, review all sections to ensure accuracy and completeness. Adjust any photos or descriptions to better convey the necessary information to the insurance adjuster.

2. Organize with Tags & Labels
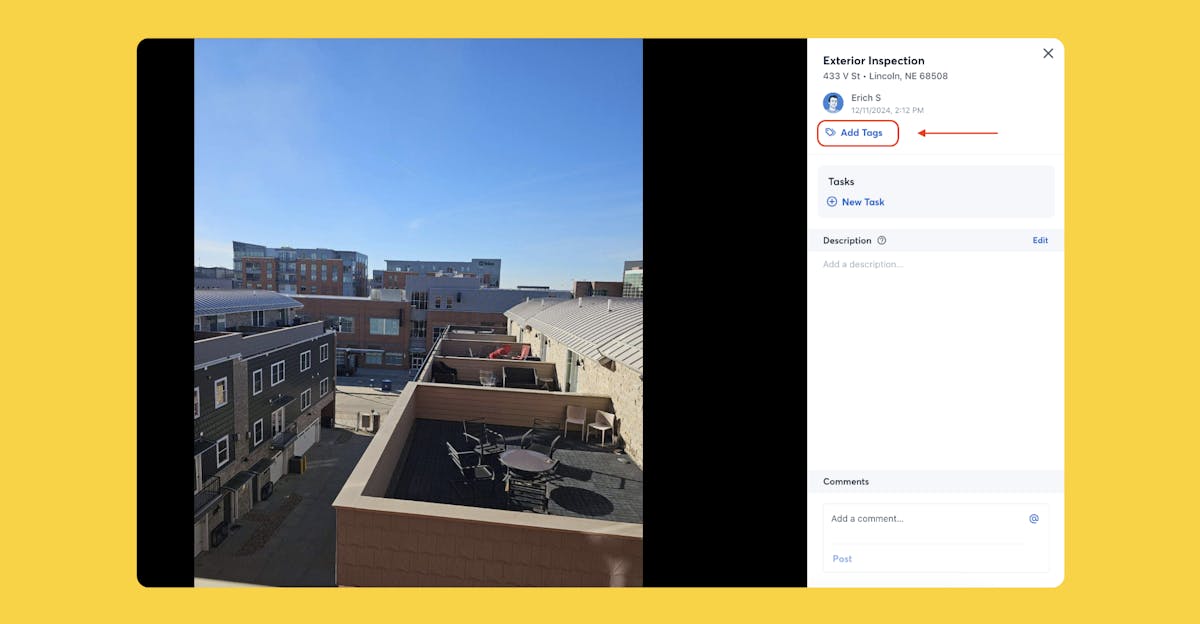
Efficient organization is crucial when managing numerous project photos, especially when preparing detailed reports for insurance claims or project assessments. By strategically using tags and labels, you can dramatically enhance your ability to quickly locate and utilize the necessary photos for any report.
- Labels: Assign project-level labels to organize and categorize your entire photo set. For example, use labels like “Storm Damage” or “Roofing Inspection” to organize your project photos based on the project type.
- Tags: Apply specific photo-level tags to each image to highlight key elements within the photos. Tags such as “Shingle Damage” or “Gutter Repair,” making it easier for your to identify the most relevant photos for your report.

3. Build Checklists into Daily Tasks
Forgetfulness happens — unless you use CompanyCam’s checklists. By integrating checklists into your daily routine, you ensure that all critical documentation is captured every time, making your insurance claim process faster and more foolproof.
Create project-specific photo checklists that ensure every critical image is captured before leaving the job site. Before your team wraps up for the day, they can quickly verify that every essential snapshot has been taken. This step is crucial for insurance claims where specific photos are required to support your case.

4. Generate PDF Reports
In the insurance world, adjusters prefer the familiarity and security of attachments over the uncertainty of clicking through links. Avoid delays by generating professional PDF reports to send as email attachments. Here’s a breakdown of the steps involved:
Click Generate PDF in the report builder.
Review the preview and download the finalized document.
Attach the PDF to your email — done!
This method not only speeds up the claim process by meeting adjusters’ preferences but also positions you as a professional, organized contractor who means business. By delivering detailed, easy-to-navigate reports directly to their inbox, you remove barriers to quick claim resolution.

5. Add Timestamps & GPS Location
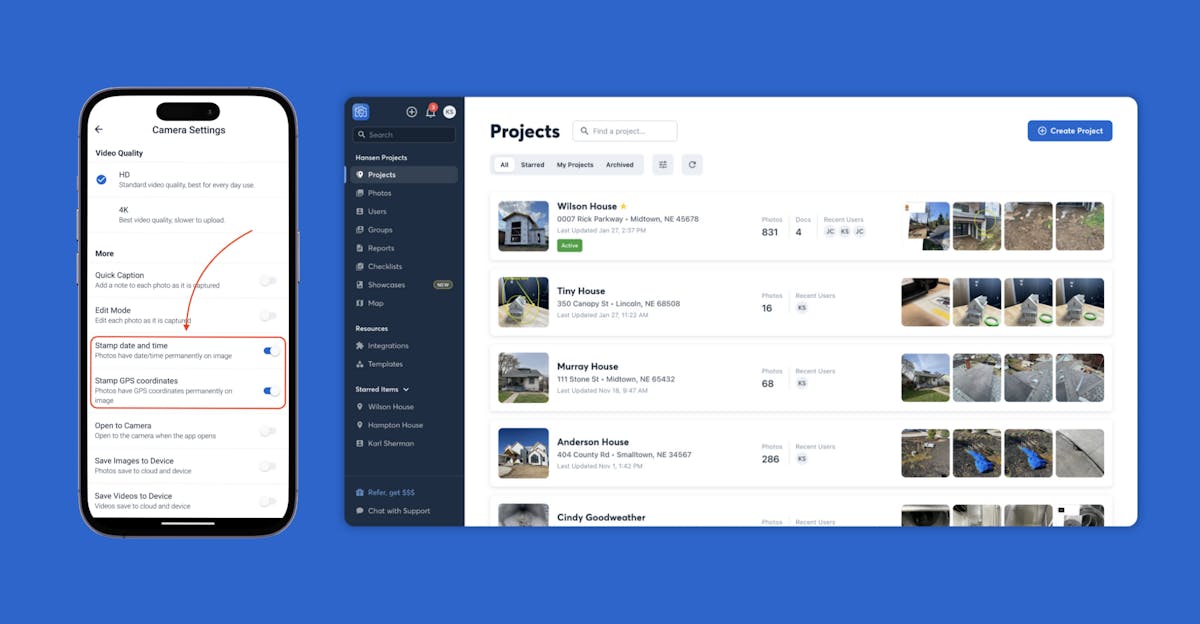
To ensure there’s no room for disputes over the timing or location of your work, adding date, time, and GPS stamps to your photos is a crucial. Timestamps act as undeniable proof of when and where the work was done, making it nearly impossible for insurance adjusters or clients to dispute your claims.
To add GPS location and timestamps to your project photos in CompanyCam, follow these steps:
Open the CompanyCam app.
Tap on your User Icon in the lower right corner.
Tap on the Settings Icon in the upper right corner.
Tap on Camera under Preferences.
Scroll to the bottom of the screen and toggle on the Stamp date and time and/or Stamp GPS coordinates.
Note: This feature is User-specific. Individual Users will need to turn the Date/Time and GPS Stamps on within their own accounts for the stamps to appear on their Photos.

6. Utilize AI Reporting Tools
Leveraging the power of AI can transform the way you create reports for insurance claims. CompanyCam’s AI tools are designed to automate the report creation process, making it faster, more accurate, and incredibly efficient. Here’s a rundown of our AI reporting tools:
Walkthrough Note
This powerful tool allows you to walk through the job site, speak your observations, and take photos — all in one go. Create various AI reports from your walkthrough video, such as detailed summaries and progress recaps, which are invaluable for insurance claims.
AI Summary
This tool automatically generates a concise AI summary of your project, accompanied by relevant photos. It’s particularly useful for quickly providing context in insurance claims, making it straightforward for adjusters to grasp the essentials of a claim at a glance.
Progress Recap
With the Progress Recap, you receive an AI-generated overview of your project, complete with photos and essential details. This feature effectively summarizes the progress of ongoing projects, which can be crucial for insurance claims involving phased payments or ongoing work.
Daily Log
Daily Log combines your daily updates, photos, project details, and upcoming tasks into one comprehensive report. This tool is especially useful for maintaining a day-by-day record that can support claims related to project timelines and delays.

7. Avoid Common Photo Mistakes
When documenting job sites for insurance claims, it’s crucial to capture the right photos that provide clear, comprehensive evidence of the damage or completed work. Here are some common mistakes to avoid when submitting photos to insurance carriers:
- Taking Low-Quality Photos: Low-quality photos that are blurry or poorly lit can hinder insurance assessments and lead to claim disputes. Ensure your camera is set to high resolution and adjust for optimal lighting conditions.
- Inadequate Documentation: Simply taking a few photos is not enough. Thoroughly document the damage from various angles and contexts to provide a complete visual account and prevent doubts from insurers.
- Not Using Timestamps & GPS Location: Omitting timestamps and GPS locations can cast doubt on the authenticity and timing of your documentation. Always enable these features to automatically record crucial details about when and where photos were taken.

Whether it’s showing the progression of a day’s work or documenting the condition of a site before and after a job, the tips we have shared in this guide will undoubtedly add transparency and credibility to your documentation.
Submitting well-documented, professional reports can mean faster claim approvals and fewer disputes. With CompanyCam, creating accurate photo reports is seamless — letting you focus on getting the job done while getting paid faster.
Join the Conversation!
Got thoughts, questions, or insights to share? Our community forum is the place to connect with others who get it. Whether you’re looking for advice, want to share your experience, or just want to be part of a growing network of pros — you’re invited.
👉 Join the Community Forum and let’s build something better, together.


