


Customer disputes can have a huge impact on a roofing company, regardless of its size. Property damage repairs, damaged brand reputations, and lawsuits can all eat up your precious time and money. But the good news is that these disputes are relatively easy to avoid.
All it takes is documenting each job with the right photos at the right time. We talked to a few of our clients across the country to get their stories and advice, and they helped us come up with this list of the 25 photos you should be taking to avoid those costly conflicts.
Photos to Take During the First Visit to the Site
Your crews aren’t the only people who should be taking photos of the job site. As soon as you send out a salesperson to take a look at the site, you should begin collecting photo documentation. At this time, you’re taking photos for two reasons.
The first reason to start taking photos this early is to document how everything looks before any crews have even set foot on the job site. This will make it easier to deal with customer disputes down the road if necessary.
The other reason to take photos this early is to help you build accurate estimates and schedules. When your salespeople take the right photos, everyone can get a crystal clear idea of what the job will entail.
When you first look at the list of photos all roofers need to take, it might seem like a lot of pictures — and there’s good reason for that. Dane Hansen of White Castle Roofing recommends taking more pictures than you think you’ll need. He says, “realistically, there’s a million things that could happen and it’s always the photo you didn’t take that you need — unless you’re taking photos of everything.”
Here’s the list of the ten types of photos your salespeople should take as they evaluate the job for the first time:
1. Each side of the building, from a distance on the ground. These photos will help you get a full picture of the building you’re working on. These photos need to be taken from a distance so that you can see the ground in the image, allowing you to see each side’s elevation. As an added bonus, these pictures make for great “before” pictures that you can use in your marketing efforts. Before and After photos go a long way!

2. The address of the job site. This tip comes from Travis Harris of Pinnacle Roofing. Even though some apps, like CompanyCam, will save GPS location data with your images and organize them by job, it’s still a great idea to snap a photo of the actual address on the building, curb, sign, or mailbox. This just gives you more proof that your photos are of the correct property if you’re in a dispute with a particularly difficult customer.
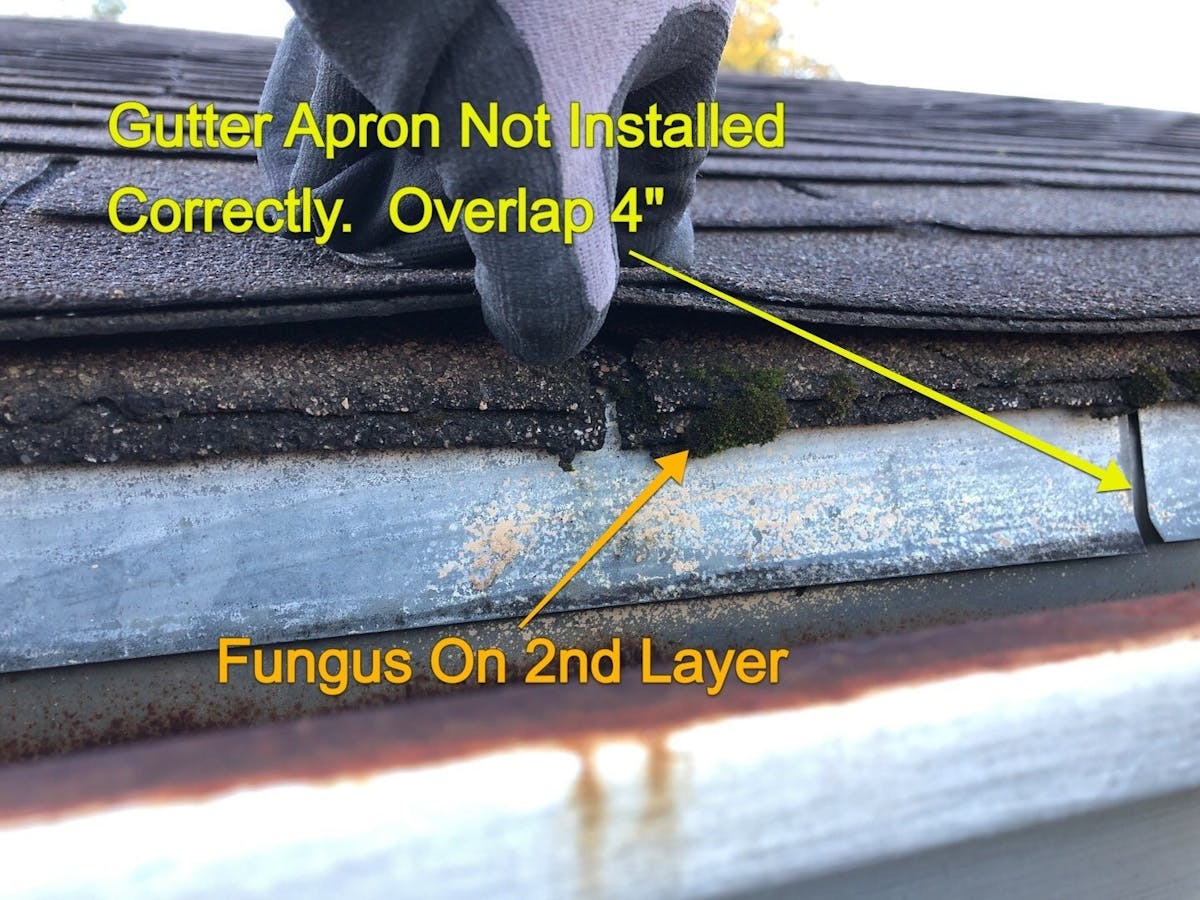
3. Fascia, drip-edge, gutters, etc. Photos of these things are helpful for multiple reasons. First, many customers don’t actually take the time to really look at their home before the job begins. It’s amazing how often we hear stories of customers that didn’t realize they had galvanized fascia before their shingles were replaced with shingles of a different color. A simple photo can help you point out what changed and what didn’t. These photos also help with creating estimates and insurance claims because you’ll have documentation of things such as the number of downspouts on the home.
4. Each section of the roof from on top of the roof. These pictures will help provide an overview of what the job will entail. These photos also work well for “before” pictures to use in marketing.
5. All penetrations and flashing. After you get photos of the major sections of the roof, it’s helpful to get close-up photos of the penetrations and flashing. These photos also help document the complexity of the job and can be used to help with ordering supplies or preparing the crew.
6. Location where the dumpster/truck will be parked. Damage to driveways is a common source of customer disputes, so it’s important to document the planned location of heavy equipment like dumpsters before they arrive. Make sure the photos clearly show any existing cracks or other damage that already exists in that location.

7. AC units or other equipment on or near the building. These photos will primarily be used to document the existing condition of this equipment in case a customer complains of damage later. Again, make sure that these photos clearly show any existing damage like dents, scratches, or frayed wires.
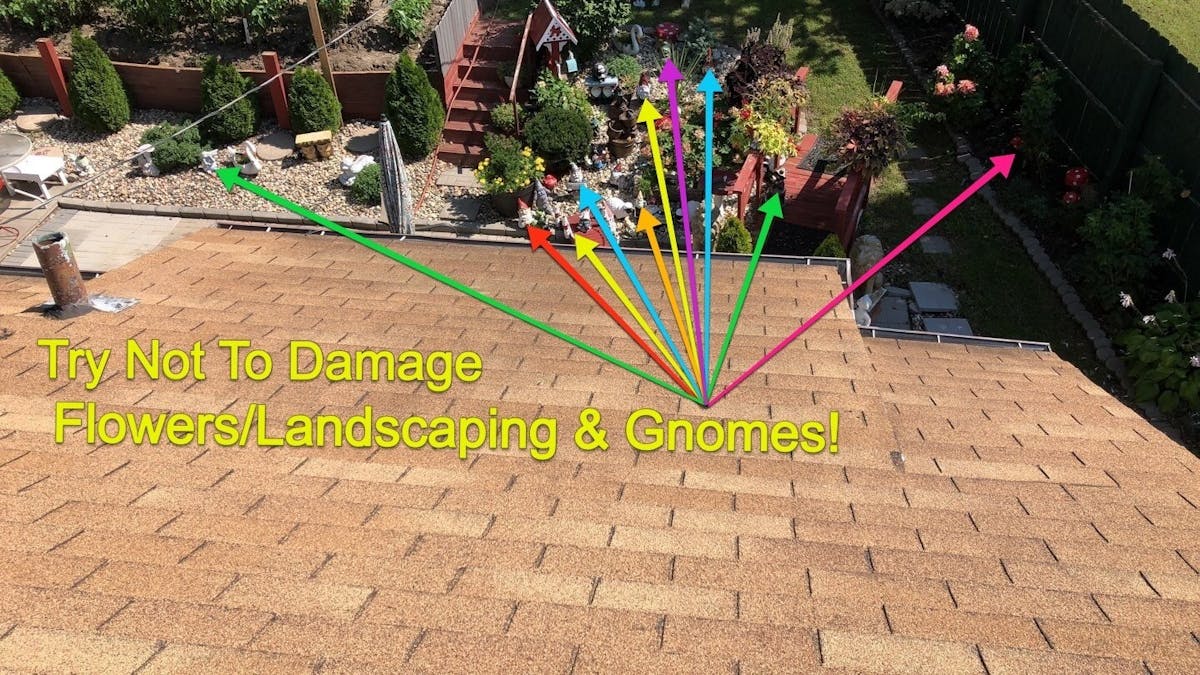
8. Yard and landscaping. Photos of the yard and landscaping are helpful in two ways. First, they’ll show the condition of the yard and landscaping before your crews arrive, which can help you address any customer complaints about the condition their yard or landscape was left in. These photos will also help you document potential obstacles or issues like tree branches touching the roof or steep hills and big bushes.
9. Existing damage including broken windows, driveway cracks, damaged garage doors, etc. As we mentioned for many items on this checklist, it’s important to take photos of any damage you see. Documenting problems like cracked windows, broken siding, and damaged garage doors will help you prove that the damage existed before your company arrived and can help provide proof of storm damage for insurance submissions.
10. Any storm damage near the building. Photos of other storm damage near the building such as downed trees will also be helpful for insurance submissions.
Photos to Take During Production
Once a crew begins working on a job, it’s important for them to take photos as the job progresses. Thorough photo documentation throughout the job will help you manage and monitor your crews, prove that your crews abided by regulations and job requirements, and help you explain any problems or unforeseen issues to your customers.
Here’s a list of the seven types of photos you should instruct your crews to take for every job:
11. Job materials as they get delivered. This great tip came from Travis Harris of Pinnacle Roofing. Taking photos of materials immediately after they’re delivered will help document and communicate to the home office that the materials arrived. Make sure that your photos are close enough to show exactly what the materials were. This will help you verify that the right materials were delivered and can be used to prove to the customer that the materials used match what you charged for.

12. Location of dumpster/truck. Once any heavy equipment or vehicles are in place, it’s a good idea to document that location. This will help you avoid any disputes for damage to other areas of the driveway or yard. Lynne Johnston of Earl W Johnston Roofing also recommends making sure that your photos show any protection you’ve laid down, like tarps or plywood.
13. Photos of the job site when the crew arrives each day. Taking a few photos at the same time each day will help you document the progress of the job. Having your crew take this picture as soon as they arrive on site can also help you hold them accountable for arriving on time.

14. Multiple photos during and after each stage of production or repair. Taking photos throughout the day and after any major stage of the production or repair process is complete are useful for documenting how the job was done. You can use these photos to show progress to your customers and to prove that no corners were cut.
15. Photos to prove specifications/regulations are being followed. If the job has any specific requirements, such as those defined by an architect, you can save yourself a lot of headache if you take photos to prove that the requirements were met.
Dane Hansen told us a story about a job they did on a fire station that demonstrated how important these photos are. After they were done with the roof, the architect questioned whether the crew had used the right sized board for the decking. “We were able to show with our photos that we did use the right size, and it prevented us from having to cut away a piece to show him.”
16. Any issues you encounter such as rotted decking. It’s not uncommon for a crew to run into issues that weren’t visible to the salesperson. No customer likes hearing that additional work needs to be done, but having a photo to show them can help you explain why the additional work is necessary.

17. Job site at the end of each day. Just like the photos at the start of each day, photos at the end of the day help to show progress and keep your crews accountable. They can also help you make sure that your crews aren’t leaving a mess each day.
Photos to Take After the Job is Complete
The list of photos that you’ll need to take after you complete a job is similar to the list that a salesperson needs to take before the job begins. These photos will be useful for two primary reasons. First, they serve as documentation for how you left the job site in case something gets damaged afterward. Second, they’ll be your “after” photos to help you show off your work in your marketing efforts.
Here’s the list of photos you’ll want to take after completing a job:
18. Each side of the building from a distance on the ground. Be sure to make these photos as similar as possible to the ones that were taken initially. This will help make your before and after pictures look more professional and draw focus to the new roof.
19. Fascia, drip-edge, gutters, etc. These photos will document that these elements were all left in good condition and, if necessary, they can help you show a customer what you did and didn’t replace when compared to the original photos.
20. Each section of the roof from on top of the roof. Use these photos to show off your craftsmanship and pair them with the original photos for up-close before and after photos.
21. All penetrations and flashing. Photos of finished penetrations and flashing will document the quality of work and can help you deal with complaints of roof leaks down the road.
22. Location where the dumpster/truck was parked after it has been removed. This photo will help you prove that you left the concrete exactly as you found it.
23. Driveway. It’s a good idea to snap a picture of the whole driveway too, just in case.

24. Garage Door. This photo will help you prove that the garage door was undamaged when you left in case they try to dispute that fact.
25. Yard and landscaping. The last photo you’ll need to prove you left everything in good shape.
What You Need to Take and Manage Your Photos
If this list of photos seems overwhelming, or if you’re thinking there’s no way you’ll ever be able to get your team on board, don’t worry. You’re not alone. The rest of this article will help you get started with taking and managing photos in your company. Once you do, everything from dealing with customer disputes to managing your people and jobs will get much easier and more efficient.
In order for this to go well in your company, you’ll need to consider four fundamental things: photo policies, storage, organization, and communication. Let’s dive deeper into each of these.
Photo Policies
Whenever you roll out something new, it’s important to have some policies or guidelines around it. Simply telling your crews to start taking photos isn’t going to cut it — you’ll end up with a big mess. However, these policies don’t have to be long and complicated.
Start by informing your team that they’ll need to start taking photos, what photos they need to take, and what they need to do with the photos after they take them. Hey look, we’ve already taken care of that second part for you!
Once you have your policies in place, designate someone to be in charge of making sure that they’re being followed. After a few weeks of everyone doing the same thing, they’ll develop the habit and you’ll be set.
Storage
Where you’re going to store all your photos is important to figure out early. Taking these photos won’t help you at all if you can’t find them when you need them. You also don’t want to make your employees use up all their cell phone storage with photos for work. Trust us, that does not make them happy.
When it comes to storage, you have a few options. Software like CompanyCam can store your photos, but we’ll tell you more about how CompanyCam can help you with storage in the next section.
If you’re not using CompanyCam, you could pay to use a cloud storage service or have all the photos sent to someone in the office that’s responsible for uploading them to a computer. If you are uploading to a computer, make sure that you’re backing it up with an external hard drive or cloud storage in case that computer crashes.
Organization
After you figure out where you’re going to store your photos, you need to determine how you’ll organize them. You definitely don’t want all your photos just hanging out in one folder or you’ll never be able to find the one you need when you need it.
Again, if you’re using software like CompanyCam, you won’t really need to worry about this. If you’re not, there are two things you’ll need to consider: the file structure and a naming convention.
The file structure will help you with sorting the photos. It’s a good idea to have a separate folder for each job, but you might not want to stop there. Having folders for specific regions or time periods may also help you organize those job folders. Inside each job’s folder, you could have separate folders for photos before the job starts, during production, and after completion.
The naming convention will help you find the right photo inside its folder without having to open all the photos to look at them. It will also make it so that you can easily search for a photo because you’ll already know what it’s saved as. You can save your photos with whatever name makes sense for you, just make sure that everyone knows what that name should be. Set up a pattern like “customer’s last name_date_description.”
Communication
As we’ve mentioned, photos can help with more than just customer disputes. If management has access to photos, they can spend less time driving back and forth to job sites. So, it’s a good idea to figure out how the people out in the field will be sending those photos back to the office and how they’ll include any additional information that needs to be recorded.
As you might’ve guessed, software like CompanyCam has a solution for this too. Other options include texting the photos as they’re taken, emailing them at the end of the day, or uploading them if you set up cloud storage.
How CompanyCam Helps Crews Take and Manage Your Photos
CompanyCam was specifically designed to help companies like yours take and manage photos extremely easily. For this article, we’re going to show you how our app helps with three of the four fundamentals we mentioned above: storage, organization, and communication. But you’re more than welcome to learn all about the CompanyCam Features. There’s a lot of them!
Storage
CompanyCam offers unlimited cloud storage to all of our customers. This means you never have to worry about running out of space or paying to upgrade for more room. But we don’t stop there. We also handle the photo uploading automatically so nobody has to worry about sending photos anywhere or spending a bunch of time manually uploading all your pictures from the day.
Organization
When CompanyCam uploads your photos for you, it automatically tags it with a location and adds it to the right job. Since photos are tracked to the job, you’ll never have to dig through a long list of folders to find the right one. It’s also super easy to go back and see all the photos for a job with our Project Timelines.
If you need to generate reports, we’ve made that a breeze as well. In fact our customers often tell us that our reports are their favorite feature. Jeff Hansen of Paramount Roofing told us about a time he had to generate reports for a job that involved 100 units. “It would’ve taken us forever the old way, but with CompanyCam, it only took us about three days. We would’ve spent a few weeks if we didn’t have CompanyCam.”
Communication
CompanyCam instantly syncs the photos you take across your entire team so anyone can access them whenever they need to. If someone in the office needs to check in on a project or if someone in the field needs to show a photo to a homeowner, it can be done in a matter of seconds on their phone. Nobody will ever need to send or ask for a photo again.
But that’s not the only way CompanyCam helps your teams communicate. A picture may be worth 1,000 words, but sometimes that’s just not enough. We also make it easy to draw on, annotate, and comment on your photos. Since these photos are automatically synced across your team, everyone can see all the information you’ve included.
Bonus: Marketing
One of the things we’ve mentioned throughout this article is how a few of these photos can work great in your marketing efforts. To help our customers do that even easier, we built a Before & After feature into our app. This feature pairs a before picture and after picture together and makes it super simple to show off the transformation you created.
Conclusion
Having the right photos on hand can save you significant expense and hassle in dealing with customer disputes. Use this checklist to help you make sure you’re taking the right photos at the right stage of each job so that you’ll have the documentation you need. Then, put a good system in place for managing those photos and you’ll be amazed at everything a few photos can help you do as a company.


