


They say a picture is worth a thousand words. But a picture can be worth a thousand dollars.
Taking the right photos the first time saves you the BIG headache of returning to projects in progress multiple times. It also prevents delays in depreciation being released on the back end of the job.
Take a look at the three most costly mistakes that contractors make when taking insurance photos and submitting them to the adjuster.
Also want to know costly marketing mistakes? Check out this mini-series:
5 Marketing Mistakes Contractors Make 👀
Mistake #1: Not Taking Enough Photos
Adjusters require visual proof of damage — they need to be able to paint a complete picture of the scope and extent of the damage. Using photos makes your life easier when showing an adjuster what has been missed on their initial report.
Providing photos with your supplement estimate will help avoid many time-consuming arguments about why labor and materials should be paid.
EXCITING NEWS: if you are writing your supplement estimates in Xactimate®, photos can be added at the end of the report! This can save you from sending multiple emails to the insurance company (and avoid the time and hassle of photos being rejected by their servers.)
Mistake #2: Not Showing the Big Picture
Adjusters require visual proof of damage and context as to where the damage was located, how large of an area was affected, and a count of materials such as window screens.
A good photo provides the adjuster with all the information they need to quickly approve your supplement items, as they can easily see the location on the property and the damage to the material.
Take the examples below. These are two photos of the same project:

This photo does not provide enough context for the adjuster to answer these questions:
- Where is the actual damage on the downspout?
- What is the length of the downspout? Is this building two stories or four stories?
- What elevation is this downspout located in the event there is a re-inspect?
Photo documentation like this will likely result in delays or outright denial of the material item you are working hard to get paid.
However, a good picture like the one below will save you time and money and show that there are additional items beyond downspout repair:
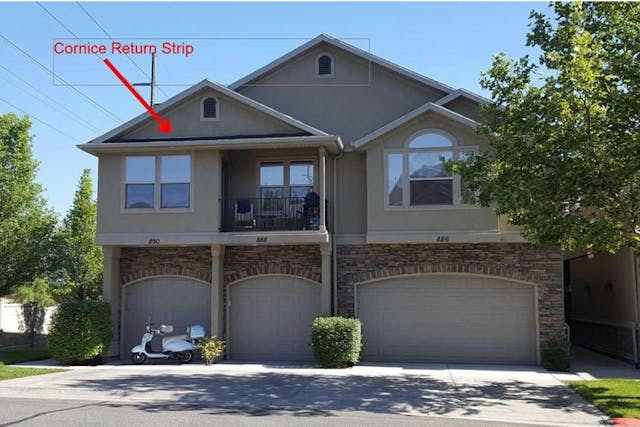
This photo proves that:
- The downspout reaches the second story
- A two-story high charge is necessary
- A cornice return strip exists and must be accounted for
- Ladders with jacks and extra labor are warranted to repair the cornice return strip area
- As this is a multi-family dwelling, line items for additional caution/safety items and labor for set-up and take-down should be paid
Without the context photo of the front elevation of this building, it would be an uphill battle with the adjuster to get the downspout paid for. And, the context photo just caught some $$ that would have been left on the table had you not proved it to be two stories, cornice returns, and the HOA situation.
Yes, I hear ya, the adjuster may have a similar photo on file, but by providing a good photo annotated with CompanyCam, you can show exactly what should be paid.
Start taking smart photos in less than 3 minutes.
Mistake #3: Attaching too many photos with your estimate
I have found that submitting too many photos tends to agitate the adjuster as they feel they have to sort through the 158 photos you just shipped over.
Adjusters are people with a job to do, just like us, and usually have multiple claims crossing their desks. Throwing a wrench in the system by asking them to review 158 photos will likely slow down the review of your supplement estimate and create an unhappy adjuster.
Submitting only the photos that provide relevant documentation of the line items you are asking for will create a good rapport with the adjuster and help create a seamless negotiation process, resulting in less stress and more $$ in your hand at the end of the process.
Start changing your photo methods today, and you will see results! You’ll be surprised how great photos can earn a hefty payout and make the negotiation process go smoothly with the adjuster.
Bonus Tips
#1: Systematize the photo-taking process
Creating a system of taking photos is the best way to ensure money is not being left on the table. The photos should be taken in the same order every time.
Establish a routine—don’t reinvent the wheel!
#2: Use CompanyCam to send Reports to Insurance Adjustors
Want a clean, easy way to share project photos with context? CompanyCam has you covered with Photo Reports.
See what’s new for Xactimate
About the Author: At XM8 Mastery, we specialize in training your team to quickly and efficiently use Xactimate to maximize insurance supplements. Learn how you to give your company the advantage during adjuster negotiations using Xactimate as a tool.
In addition to training, we are here to provide continued support and assist you with industry-related issues to keep.


